
Custom print layouts
In Planado you can set up your print layouts. This way your layouts can have a view that you want. Custom print layouts allow you to select an input format of PDF and HTML. the
The print layout is edited through an HTML file. It uses Liquid as a markup language. You can find its documentation on the official website.
Print layouts in the interface
Open Settings → Printing. The list shows each layout, its source file and output format. To download the default HTML source, click job_layout.html in the File column of the Default print layout row. Open the downloaded file in your HTML editor.
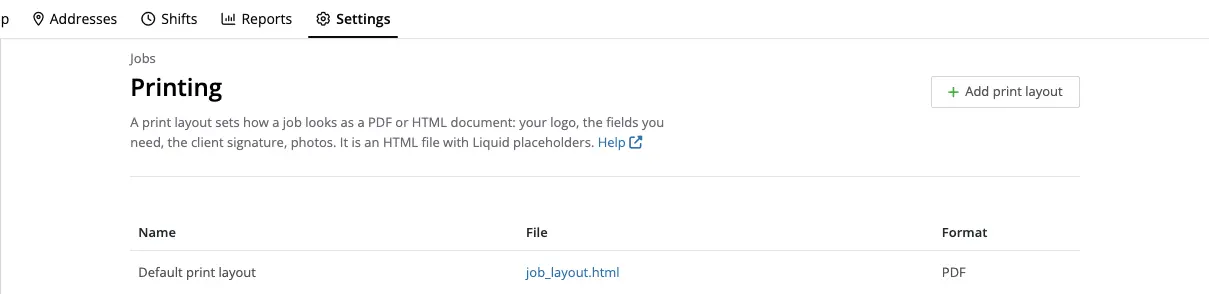
Add a layout and link it to templates
Click Add print layout, enter a name, upload the prepared HTML file and choose PDF or HTML. If needed, select Add layout to all templates. You can then select Allow printing from the mobile app and Make required for job completion. Click Add to save.
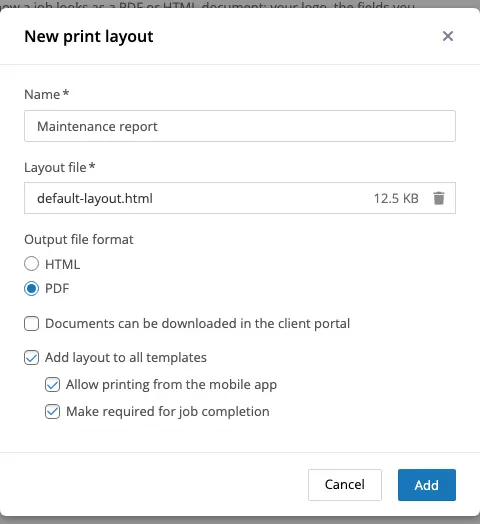
To use the form in selected templates only, leave the all-templates option off and configure the layouts in the relevant template. Open Settings → Templates, select the template and find the Print layouts section (expand it if collapsed). Select the layout and, if needed, In mobile app and Required, then save the template. Required mobile printing prevents successful job completion until the form is generated in the mobile app.

Print a job
Open a job and click Print in its bottom bar. If the old Print button is still shown at the top, its first click opens the panel and explains the new location.

The Print layouts panel shows the forms available for the job. Click Generate beside a form. When the document is ready, its row shows the latest generation time and a PDF or HTML link. Open the link to download the document; use Reprint to generate it again using the current job data.

Older documents for layouts no longer available on the job appear under Printed earlier. They can be opened but not regenerated there. Close the panel with its close button.
The sections below describe editing the HTML source. The default layout itself cannot be edited; upload a separate custom layout.
Currently, the default layout cannot be modified.

Substitutions
Print layouts use different substitutions to access different Planado entities. In Liquid language, curly braces are used to access variables. Because of that, to access Planado entities we also use curly braces. For example, {{ job.template.name }} will print out your job template name. In the same way, you can access canned words like “Job". Here we will list most of the substitutions used in the print layouts.
- job — the word "job";
- job.serial_no — job serial number;
- job.status — job current status;
- job.template — job template;
- template — the word "Template";
- type — the word "type";
- job.type.code — job type;
- scheduled_at — the word "scheduled at";
- job.scheduled_at — job scheduled date and time;
- duration — the word "Duration";
- job.scheduled_duration — job planned duration;
- en_route_at — the word "En route";
- job.en_route_at — job en route date and time;
- started_at — the word "Started"
- job.started_at — job start date and time;
- finished_at — the word "Finished";
- job.finished_at — job finished date and time;
- created_at — the word "Created";
- **job.**created_at — job creation date and time;
- job.creator.name — the name of a user who created the job;
- assignee — the word "Assignee";
- job.assignee — job assignee if it was assigned to an individual worker;
- job.team — job assignee if the job was assigned to a team;
- description — the word "Description";
- job.description — job description;
- address — the word "Address";
- job.address.full — job address;
- client — the word "Client";
- job.client.name — name of job client;
- site — the word "Site";
- job.site.name — name of job site;
- resolution — the word "Resolution";
- job.resolution.name — the job resolution;
- job.resolution.comment — the comment to the job resolution;
- external_id — the word "External ID";
- job.external_id — job external ID;
- contacts — the word "Contacts";
- contact.name — the name of the job contact;
- contact.value — the phone number of the job contact;
- field.name — the field name (for custom and report fields)
All these substitutions can be found in the default print layout.
Let's also look at the Shopify Liquid tools.
Shopify Liquid operators
you Shopify Liquid is a markdown language. It allows to dynamically set layout content depending on your job.
The output operators:
{{ }}: outputs variable value.
{{ job.serial_no }} {{ job.scheduled_at | datetime }}In this example, it will output the job serial number and job scheduled date.
{% %}: Is used to control logic and cycles. For example, it is used with the if operator.
{% if job.type %} <div class="field"> ... </div> {% endif %}In this example, the
element will show up only when a job type is present.
1. if — conditional expressions
The if operator is used to set up conditions for information output in a print layout. The information will be shown only if the conditions from the if operator are met.
Synthax:
{% if condition %} // The code runs if the condition is metExample: check if the client's address is filled
{% assign address_present = job.address.formatted | filled? %}Using eslif: checking if a worker or a team is assigned to the job.
  `<div class="field">`
    `<label>{{ 'assignee' | translate }}</label>`
    `{% if job.assignee %}`
        `<span class="value">{{ job.assignee }}</span>`
    `{% elsif job.team %}`
        `<span class="value">{{ job.team }}</span>`
    `{% else %}`
        `<span class="value empty-value">{{ 'empty' | translate }}</span>`
    `{% endif %}   </div>`
2. for - cycles:
For operator is usually used with data arrays. For example, to output job report fields.
Syntax:
{% for item in items %} // Code will run for every item in the "items"Example: Contacts
{% for contact in job.filled_contacts %}<div class="field contact">
<label>
{% if forloop.first %}
{{ 'contacts' | translate }}
{% endif %}
</label>
<span class="value">
{{ contact.value }}{% if contact.name and contact.value %}, {% endif %}
{{ contact.name }}
</span></div> {% endfor %}
Here, the cycle goes through all elements of the contacts array to output their names and phone numbers.
3. case - condition selection
As well as if, the case operator is used to set conditions.
Syntax:
{% case variable %}Example: settings conditions for different field types.
  `{% for field in job.report_fields %}`
`<div class="field">`
    `<label>{{ field.name }}</label>`
    `{% case field.field_type %}`
        `{% when 'input' %}`
            `...`
         `{% when 'action' %}`
            `...`
        `{% when 'checkbox' %}`
            `...`
        `{% else %}`
            `...`
    `{% endcase %}`
`</div> {% endfor %}`
In this case, conditions for each field type are set separately.
Basic operators:
==: checks equality
{% if job.description == "" %}
<span class="value empty-value">{{ 'empty'| translate }}</span>
{% endif %}In this example, an empty value will be shown only when the job description is empty.
!=: checks for inequality
{% if job.resolution.comment != "" %}
<span class="value"> ... </span>{% endif %}
In the example resolution comment will be displayed only when it is not empty.
In the same way, you can use other basic operators:
>: greater than;
<: less than;
>=: greater than or equal;
<=: less than or equal.
Logical operators:
and: logical AND: is true only when both conditions are met
{% if job.template == "Delivery" and job.assignee.name == "John Smith" %} John Smith's delivery {% endif %}
In the example, the condition is met only when the template "Delivery" is used and the assignee is John Smith.
or: logical OR is true when either or all conditions are met.
{% if job.assignee or job.team %} ... {% endif %}
A value is displayed when an assignee or a team is assigned to the job.
not: logical NOT: reverses condition from true to false and the other way around.
{% if not job.description %} ... {% endif %}
Filters:
empty: checks if the variable has an empty value.
{% if job.resolution.comment | empty %} ... {% endif %}filled: checks if the variable does not have an empty value.
{% if job.description | filled %} ... {% endif %}
Other filters:
datetime: changes date format to a readable one. Contains time.
truncate: cuts down a string to a specified length.
translate: translates string to your Planado language.
Let's look through different ways you can modify a print layout.
The print layout from the example you can find in the attachment to this article.
Changing company logo
You can change the Planado logo to your own by editing the print layout. To do so, you need to use the custom-logo field.

First, you need to convert your company logo to base64 format. You can use an online converter to do so. After that, you can use the generated base64 code in the print layout.

Change the logo tag to the custom-logo tag in the print format body.

Now you can add the image into the

After that, you can set the logo dimensions for the print layout. The logo will look better if it has a height and a width of around 100-200px. The new dimensions should be a multiple of the original dimensiones. For example, if you have a logo with 1920x1080px, you can set its resize to 192x108px. In our example the original size was 1200x1200px, so we will set its resize to 120x120px.

After editing the HTML file, open Settings → Printing → Add print layout. Enter the name, upload the file and choose its output format. Link the layout to the required templates as described above, then click Add.
In the opened window enter your print layout name and upload your HTML file of the print layout. Depending on your needs you can select either PDF of HTML as an output format. In this example, we will use the PDF format.
To check the custom layout, open a job whose template includes it, open the bottom Print panel and click Generate beside that layout. Open the PDF or HTML link when ready.
Your job will be printed using your new print layout.

In the file, your logo will be used instead of the Planado one.
If you need to tweak the logo size or modify it some other way, you can do that in the HTML file and then re-upload your print layout.

Adding photos to a print layout
By default, photo field values are displayed as file names. If you want to display actual photos instead of them, you need to specify it in the print layout.

The conditions to display photo fields are set in the report fields part of the print layout.
{% when 'image' %}
{% if field.value == empty_list %}
{{ 'empty' | translate }}
{% else %}
{% for image in field.value %}
{{ image.name }}{% unless forloop.last %}, {% endunless %}
{% endfor %}
{% endif %}
Here we can see that if a photo field has an image, it will show only its name {{ image.name }}. To display an actual image, we need to change that part.
{% when 'image' %}
          {% if field.size > 0 and field.filled %}
          {% for image in field.value %}
     {{image}}
            {% endfor %}
          {% endif %}
Now instead of a file name an actual image is displayed. However, it is displayed in its actual size.

Usually, you do not need photos with such a large size. Fortunately, we can resize images using the resize filter in the {{ image }} operator. In our case, images have 1080x1920px dimensions. Because of that, we will use the 108x192px images in our print layout. We will also add a space between photos.
{% when 'image' %}
          {% if field.size > 0 and field.filled %}
          {% for image in field.value %}


     {{image | resize: 108, 192}}


            {% endfor %}
          {% endif %}

In a newly created layout photos have adequate size and a space between them.
We can also add a counter that will transfer photos to a new line if a line has more than 4 photos. In this case, we will use two extra
.image-row {
display: flex;
flex-wrap: wrap;
margin-bottom: 5px;
}
.image-wrapper {
flex: 1 1 calc(33.33% - 5px);
margin-right: 5px;
margin-bottom: 5px;
}
.image-wrapper:nth-child(3n) {
margin-right: 0;
}
Now every image is placed in a separate
{% when 'image' %}
{% if field.size > 0 and field.filled %}
{% assign image_count = 0 %}
{% for image in field.value %}
{% if image_count == 0 %}
{% endif %}
{{ image | resize: 108, 192 }}
{% assign image_count = image_count | plus: 1 %}
{% if image_count == 3 %}
{% assign image_count = 0 %}
{% endif %}
{% endfor %}
{% if image_count != 0 %}
{% endif %}
{% endif %}
In this example, every image in a photo field increases the image_count counter. When image_counter reaches the value of 3, it moves an image to the next line and resets itself.
This is how a printed job looks like when it has five photos in one photo field.

You can find this print layout in the attachment to this article.
HTML as an output format
You can change your print layout output format from PDF to HTML. HTML printed job is easier to edit in a text editor like Microsoft Word or OpenOffice Writer. If you want to edit your printed job after downloading it, you should use HTML as an output format.
To change the output format:
- Open the Settings → Printing page
- Select a print layout;
- Select HTML as an output format and click the Save button.

After that, this layout will use HTML as an output format when printing jobs.

You can edit this file using a text editor of your choice.
If you have any questions about this or other Planado features, email our support team at support@planado.app.